|
Plumbing Tips Oil Burner Air Purging
If you had run out of home heating oil and have refueled your tank or disconnected your oil burner you will need to purge the air out of the oil line for your burner to work. There are two types of oil feeds to a burner. A single pipe system and a two pipe system. If you have a two pipe system you are all set. When the burner starts it will circulate the fuel in the lines and self purge the air from it. If you have a single pipe oil feed then you will need to purge your oil line. There is a 3/8" bleeder fitting on the fuel pump to the left of the burner. Near where the oil line come into the burner. It looks like a small black nipple with a nut on it facing the bottom of the burner. It is the least messy if you use a small clear hose, (1/2" vinyl tubing usually works best) and a bucket. Using the wrench crack the bleeder fitting open and run the burner. You can start the burner by pressing the Red button on the top of the controller. Some new burners have a pre purge of about 10 sec before it will engage the pump, you will know when the burner comes on if this is the case due to the oil automatically feeding into the tube or if it is delayed. Either way you will eventually see oil feeding into the hose either in a foam state (indicating air) or a solid stream of oil which you want. At this point when you see a steady stream you will need to shut the bleeder fitting and your done. If there is a substantial amount of air the burner will shut down as your bleeding it due to it not firing after 30 seconds, in which case you will need to wait a second or 2 and then press the reset to start over. Continue doing this until the burner starts and runs. That's about as much as you can do without having the proper test instruments and knowledge of fuel oil. If you are still having trouble please give us a call. We will be happy to service it for you! Don't forget to put the oil you removed back into the oil tank. The easiest place to do that is at the fill pipe where the delivery company fills it outside. |
|
Plumbing Tips Help Prevent a Frozen Pipe
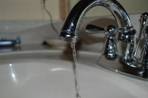
A faucet that won't yield water is the first sign of frozen pipes. If a severe cold snap hits use the following the suggestions below to help to keep your pipes from freezing: * Keep a trickle of water running from the faucets. Running water won't freeze * Use a heat lamp or small heater at exposed pipes. Careful not to burn anything. * Wrap un-insulated pipes with newspapers, heating wires, foam, or self-adhesive insulating tape. * Keep doors open between heated and unheated rooms. Thawing Frozen Pipes If you have a pipe that has frozen: * Shut off the water at the main shutoff valve and open the faucet nearest to the frozen pipe so it can drain as it thaws. * Be ready with plastic drop clothes in case leaks occur. * You can use a Propane Torch. A torch will quickly thaw a frozen pipe. * Shield flammable areas with a fireproof sheet; don't let the pipe get too hot to touch. * Use a Hair Dryer like the torch; a dryer will gently defrost the pipe. This takes some time but is a safer method. * Use a Heating Pad and wrap the length of pipe with it. * Use a Heat Lamp For pipes behind walls, floors, or ceilings, point a heat lamp 8 or more inches from the surface. This will help heat the area behind the wall. * You can use Hot Water if no other method is available, wrap the pipe (except plastic) in rags and pour boiling water on it. If you cant fix it yourself please call us! |
|
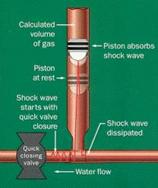
Plumbing Tips Water Hammer Water hammer is usually recognized by a banging or thumping in water lines. The noise occurs when the flow of moving water is instantaneously stopped by a closing valve. This sudden stop results in a pressure spike behind the valve which acts like a tiny explosion inside the pipe. This pressure spike will reverberate throughout the plumbing system, rattling and shaking pipes, until it is absorbed.Normally, a sufficient pocket of air will absorb such a pressure spike, but if no pocket of air is present, expensive fixtures and appliances within the plumbing system will be damaged as they are left to absorb this pressure spike.One trick that sometimes gets results is draining your water by turning off the water main. Open the hot and cold on the lowest fixture in the house like a basement sink or laundry. when the water is completely drained close the fixture you opened and SLOWLY turn on your water main. This method will allow to recharge any air chambers that are in your piping system.If the water hammer is still present then please give us a call and we can install Air Chambers to take care of this issue. |
|
Plumbing Tips Sink Drains
It's always best to prevent clogs before they happen. Be alert to the warning signs of a sluggish drain. It's easier to open a drain that's slowing down than one that's stopped completely.
Run scalding or hot water down the drain to break up grease buildups. If the hot water doesn't work then there may be an object or hair in the drain.
Clearing Drains with a Plunger- you thought it was simple but did you know A Plunger often fails to work because it's incorrectly used? Don't make the typical mistake of pumping up and down two or three times, expecting the water to whoosh down the drain. Though no great expertise is needed to use this simple tool, here are a few tips to guide you: Choose a plunger with a suction cup large enough to cover the drain opening completely. Fill the clogged fixture with enough water to cover the plunger cup. Coat the rim of the plunger cup with petroleum jelly to ensure a tight seal if you cant get it to seal. Block off all other outlets (the tub overflow, second drain in a double sink, adjacent fixtures near the clog) with wet rags. Insert the plunger into the water at an angle so no air remains trapped under it. Use 15 to 20 forceful strokes, holding the plunger upright and pumping vigorously.
Using Chemical Drain Cleaners If water is draining somewhat, but plunging has failed to open the drain completely, you may want to try using a drain cleaner. Routine use of chemical drain cleaners to prevent clogs may eventually damage your pipes but these cleaners can be helpful in opening clogged drains. Whenever you use chemicals, do so with caution and in a well-ventilated room. Be sure to take these precautions: Never use a plunger if a chemical cleaner is present in the drain; you risk splashing caustic water on yourself. Wear rubber gloves and eye protection to prevent the chemical from burning your skin or eyes. Don't use a chemical cleaner if the blockage is total, especially if the fixture is filled with water. It won't clear the blockage and you'll face another problem of how to get rid of the caustic water. Never use a chemical cleaner in a garbage disposal or a toilet. Read labels and match cleaners with clogs. Alkalis cut grease; acids dissolve soap and hair.
The best method to unclog a drain is the use of a snake.
Please give us a call for any drains that you cant clear yourself. |
|
Plumbing Tips When leaving for vacation
If you are heading off on vacation you should shut off your water before leaving your home.
If it's warm outside, you don't need to do much else to your pipes.
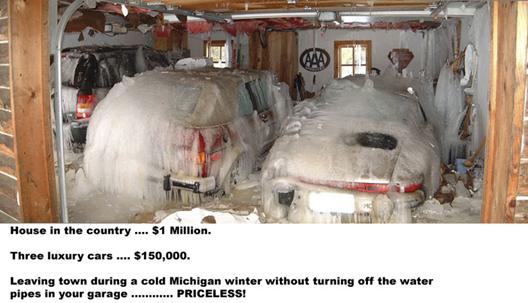
If it's winter however, you should drain your pipes to prevent them from freezing. If your pipes freeze they could burst, causing a major flood, and no one wants to come home from vacation to a mess.
If you are heading south for most of the winter (LUCKY) it is usually best if you ask your utility provider to shut off the water to your home from the street. If you don't want to do this or if you are on a well then just shut off the main water supply to the house.
Water Pipes Drain all of your pipes, beginning at the top floor of your home and working down. The best way to winterize is to blow all the water from the pipes with an air compressor.
1. Open all the faucets that you have in your house, including all the spigots, sink, and bathtub faucets that you have.
2. Go outside and take off any garden hoses that may be attached to your outdoor spigots. Have your irrigation system winterized by a professional company like Rainmaker Irrigation and drain outdoor faucets.
3. You may want to drain your water heater as well. Make sure that the gas or electric breaker is off before draining a water tank. you could cause damage to the unit running it without water init. If you have a drain nearby, attach a hose to the water valve on your heater. Direct the hose to the drainage area and open the water heater valve and let it go. You may need a pump if you don't have a lower area to drain the water to. .
4. You should leave at least one valve open in your home to allow air to flow through and excess water to drain. This valve should be located in the lowest part of your house, preferably the basement. If you don't have a basement, open a valve on the first floor, preferably in the garage or utility room.
Drainage Pipes Drainage Pipes can also freeze if there is water left in them and it is very common because most people forget that there is water in them. If you are going away, follow these steps to prevent freezing of your drains:
1. Clear out the traps underneath your sinks. You can do this by removing the trap fully, or by opening the clean-out plug. Have a small bucket ready to catch the waste water.
2. Your bathtub, toilet, and basement drain have hidden traps that should be weatherproofed. Use pipeline antifreeze or even windshield fluid that is rated for winter weather. Toilets require a gallon of fluid in the tank. Flush first, then dump the fluid in the tank, and flush again.
3.Bathtubs, floor drains, and other hidden traps require about one quart of a pipeline antifreeze. Poor the quart down the drain. Simple!
4.Clothes washers and dishwashers should be drained of water. Try to get as much water out as you can. Whatever you do, do not put windshield washer fluid into these appliances, as it will break them. you may need a wet vacuum to suck the water from the dishwasher hose.
Returning Home Now you will want to restore water to your pipes. Turn off all faucets inside and outside that you may have left open. Call your utility and ask them to turn the water if you had it shut off in the street. If you turned off your own water, turn the main water supply back on again, slowly. You should hear a bunch of sputtering. This is normal when you fill the water back into the pipes.
Be sure to turn on the gas or electricity supply to your water heater. It may take an hour or so before you get hot water!
*Don't turn on the water heater before completely filling it you could damage the tank.
Please give us a call if you need us to do this service for you. |
|
Home |
|
About Us |
|
Contact Us |
|
Plumbing Specials |
|
Rainmaker Irrigation |
|
Testimonials |
|
Business Associates |
|
Payments / Rebates |
|
Photo Gallery |
|
Go Green |


|
To contact us: |
|
www.AmericanPlumbingNH.com NH-603-897-9606 MA-978-548-2000 Info@AmericanPlumbingNH.com |

|
Plumbing Tips |
|
Plumbing Tips How to Clean Kitchen & Bathroom Faucet Aerators
Have you ever had a faucet that just wasn’t giving you the water flow that it used to have? Don’t replace it just yet…..try cleaning the Aerator.
That’s the little screen that the water flows out of. Many times it gets clogged with debris from the water.
This is an easy fix that most of the time you can do yourself.
Here is what to do: all you need is a pair of pliers or a crescent wrench.
So you don’t loose anything down the drain keep the stopper in the sink closed.
1 – You want to be careful not to scratch it with the pliers or a crescent wrench so I often wrap a washcloth or small rag around the aerator to protect it. Then use a pair of pliers or a crescent wrench to unscrew the aerator from the faucet.
2 - Disassemble the aerator. Some aerators are more intricate than others but all have a screen, housing unit and body. Take note of how everything goes together so you can put it back together again. There is usually a washer that is the first piece or deepest into the faucet. Sometimes the washer can become stuck and will shoot out when you run the water. Keep the stopper in the sink closed so nothing falls down the drain.
3 – Once you have it in your hand often times you can just turn it upside down and run a little water backwards through it to clean out the debris. Many times the debris is visible and just washing it off will solve the problem.
If it doesn’t work then:
Submerge all the parts in a bowl of white vinegar. Let the parts soak overnight.
4 - Reassemble the aerator and screw it back onto the faucet remembering how it came apart. Most home improvement stores will sell new standard Aerators if it needs to be replaced.
If all else fails then give us a call. |